
So I cheat. I clean up my polish after I finish my manicure and nobody ever has to know that it looked a little messy before. I'll walk you through what I do to get a picture perfect manicure so you can do the same. I'd like to point out that this tutorial is a remake of my original Nail Polish Clean-Up Tutorial from MakeupAlley.
First off, the supplies. I use 100% acetone. Yes it's drying, but it works so well. You can try using your regular nail polish remover, but nothing works quite as well as straight acetone. I've heard that nail polish thinner also works, but I haven't tried that. I got this acetone at Sally Beauty Supply and it was only a couple bucks. You don't have to use much so the bottle will last you a very long time.
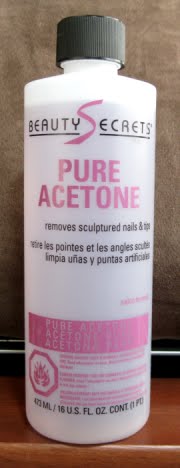
I'm aware that there are conflicting opinions on the potential dangers of using acetone and the amount that is absorbed through your skin. I've read both sides of the story and I choose to use it to clean up. If you prefer not to, you would want to find an alternative to this method of clean up.
Be very careful with straight acetone! It will eat through the finish on your table, laptop, cell phone, anything that's painted, etc. so if you spill it there's no way to work fast enough to get it off before it ruins the finish. It's also highly flammable and volatile so if you smoke or have any type of open flame nearby, you can start a fire. Acetone smells pretty bad, but don't even think of burning a scented candle nearby. You could ignite the fumes and be in for a world of hurt.
You also don't want to pour acetone down your drain or toilet. It can melt the plastic pipes in your sink and I don't know about the water district where you live, but my water company is always sending out flyers on what not to flush down the toilet. They've made it a point to remind homeowners not to flush flammable substances. I've never had to dispose of straight acetone, but I've heard soaking it up with an old rag and letting it evaporate outside is one way. If you have a good way, let me know in the comment section.
You're also going to need some type of brush for the clean up. I've used paintbrushes and eyeshadow brushes and they both work well. The brush you choose is a very individual thing. I used to love my American Painter #6 Filbert (that I bought at JoAnn's Fabrics), but once it started showing signs of wear and tear, I replaced it with the exact brush and the new one didn't work as well. The new one's bristles aren't as stiff as my old favorite so that made me fall out of love with it.

I gathered up all the small brushes around my house and tried out each of them. The one I like best now is my EcoTools eyeshadow brush. I purchased it at Target and originally intended on using it for eyeshadow. I didn't like it for eyeshadow (it's too slippery or something) so I tried it for nail polish clean up and fell in love with it for that purpose. I like how it holds more liquid than the Filbert so I don't have to dip into the acetone as often.
It's starting to show signs of wear and tear so I'm probably going to need a new one soon. See how my EcoTools brush is starting to look a little haggard? I've been using it almost every night for several months now so I've been able to get a lot of use from it. I predict I'll still be able to get a lot more use out of it, though. I've actually been using this one for about a year now and though it still looks pretty ragged, it's holding up quite well.

So now that you've got your brush and acetone, that's all you need! You also might want to have a small glass or ceramic bowl (or cup) to pour the acetone into, but I dip my brush directly into the bottle and have never had a problem. I wouldn't use plastic, though. I once poured acetone into a plastic cup and it ate through the bottom. What a mess that was!
You also might want to have a napkin or paper towel to wipe your brush on once it gets some polish on it. I am lazy and if there's excess polish on my brush, I dip into the acetone a few times to wash it off. I haven't had any problems in the 16 months I've been doing this so I don't think the napkin is necessary.
One important thing about cleaning up is you still want to try to be neat when applying your polish. The neater you are in applying, the easier clean up will be. I always try to create a gap when I'm painting and I try to avoid getting polish on my cuticles. I even try to avoid getting basecoat and topcoat on my cuticles. However, more often than not, I find that I get polish flooding my cuticle at least once per manicure. This clean-up method can fix it, but it takes longer to clean up a flooded cuticle.
Another reason to be neat from the start is that some polishes are a pain in the butt to clean up. Polishes with a lot of pigment will be harder to remove with the acetone. For instance, OPI Smitten With Mittens and OPI Vodka & Caviar were a nightmare to clean up! You don't want to know how long it took me to get my manicure looking halfway decent when I wore those.
Polishes that contain glitter or flakes can also be difficult to clean up. Glitter and flakes don't dissolve in acetone (at least not in the small amount of time you have them in contact on your nails) so a lot of times you'll have a flake or a piece of glitter sticking out along the edge of your gap. I clean these up while my polish is still pretty wet so I can use my clean-up brush to push any stray glitter or flakes to where I want them.

With that said, this method works like a charm on creams and jellies. I've also found that it's easier for me to clean up a darker polish. I guess because it's easier to see?
Something else I've noticed that makes clean up easier is maintaining your cuticles. If I slack on using cuticle softener and pushing back my cuticles, it's harder to get a nice clean gap. I use a cuticle softener and gently push my cuticles back about once a week and that seems to help make it easier to clean up.
In my original clean-up tutorial, I mentioned that I put top coat on and wait for my polish to be pretty dry before cleaning up. However, I've noticed that it's much easier to clean up if I do it while my polish is pretty wet and before I put on top coat. After cleaning up, I carefully apply top my top coat. Since my polish is all cleaned up, usually I can apply my top coat neatly. If I go outside the lines a bit, I usually just leave it since it doesn't really show much. If you want, you can clean up the top coat as well with the brush and acetone.
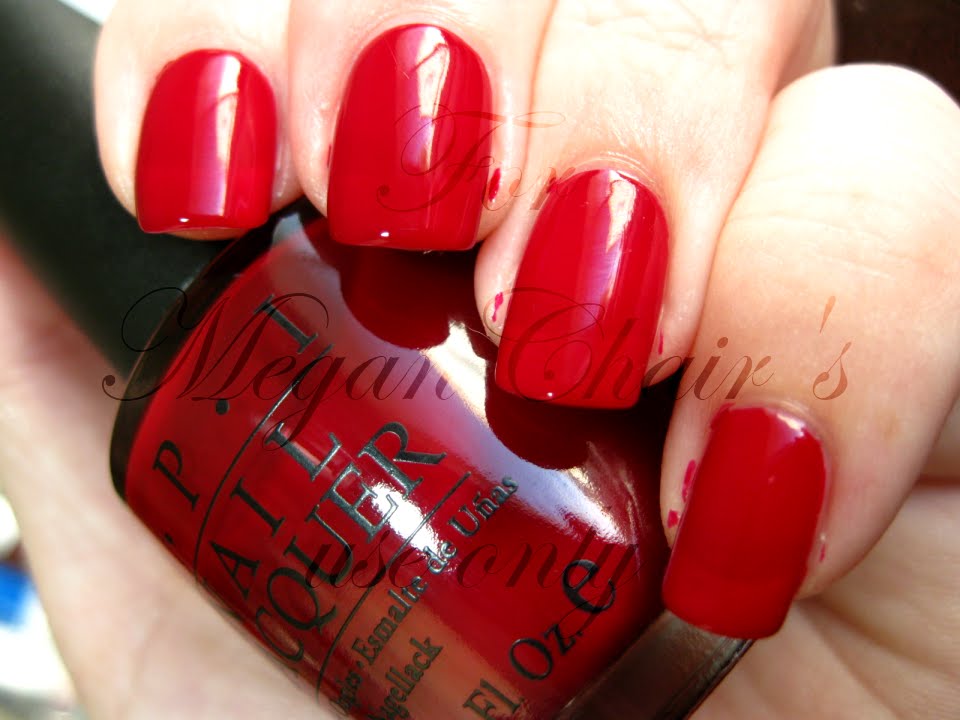
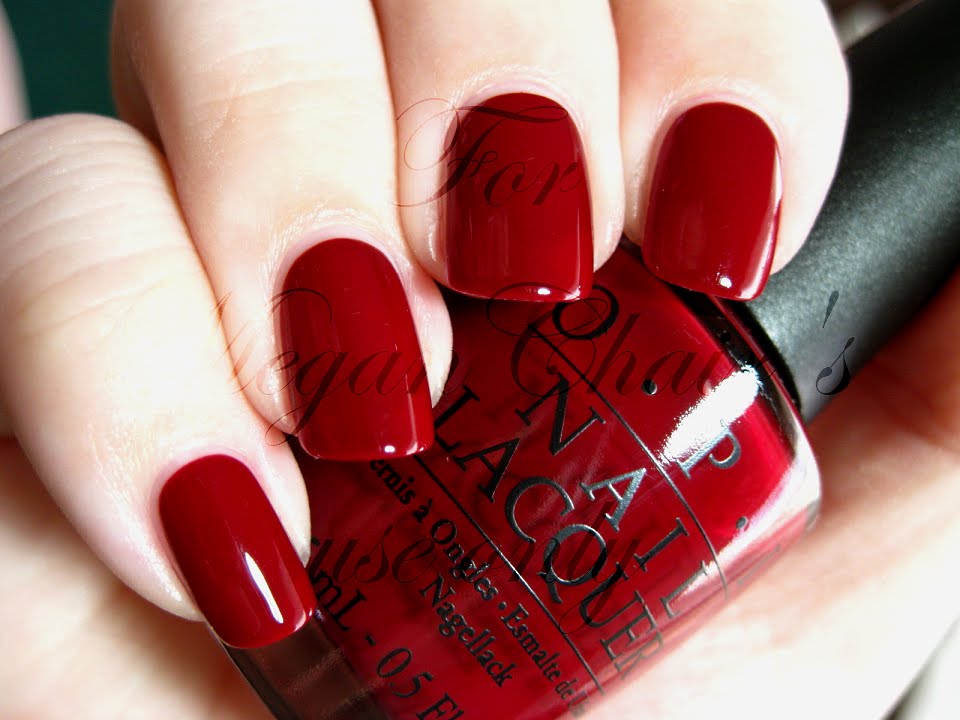
What you see below is my manicure before clean up. You can click on the pictures to make them larger, if you'd like. As you can see, my manicure isn't terrible, but it's not as neat as I'd like. (I used OPI Malaga Wine for this tutorial, by the way.)


While I'm usually not bad at painting my right hand, my left hand comes out a little messier. There is polish on the skin around my nails and it's just messier in general.
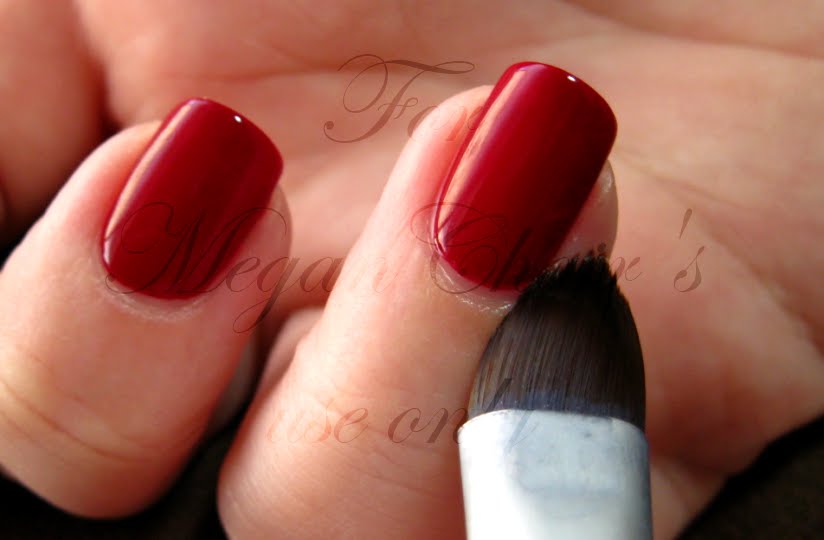
To clean up, you're going to want to dip your brush right into the acetone. Wipe the excess off on the lip of the bottle and then gently sweep away the polish along the sides of your nail until it's as neat as you'd like. When I clean up the sides of my nails, I use my thumb (or my index finger when I'm cleaning up my thumbnail) to gently pull the skin beside each nail out of the way.


You also want to clean up your gap. Gently sweep the brush along the edge of your polish to neaten the edge.
Once you are done with all 10 nails you'll want to apply your top coat. Wait a bit and gently wash and dry your hands. You don't want to be too vigorous since your polish is probably still dentable. It wouldn't be fun to spend all that time on getting a picture perfect manicure only to mess it up washing your hands.
You'll want to apply something for moisture now - either cuticle oil, cream, etc. Just use whatever you usually use for dry hands and cuticles. I apply these while my hands are still a little damp. I've found that these products work better when your hands aren't totally dry.
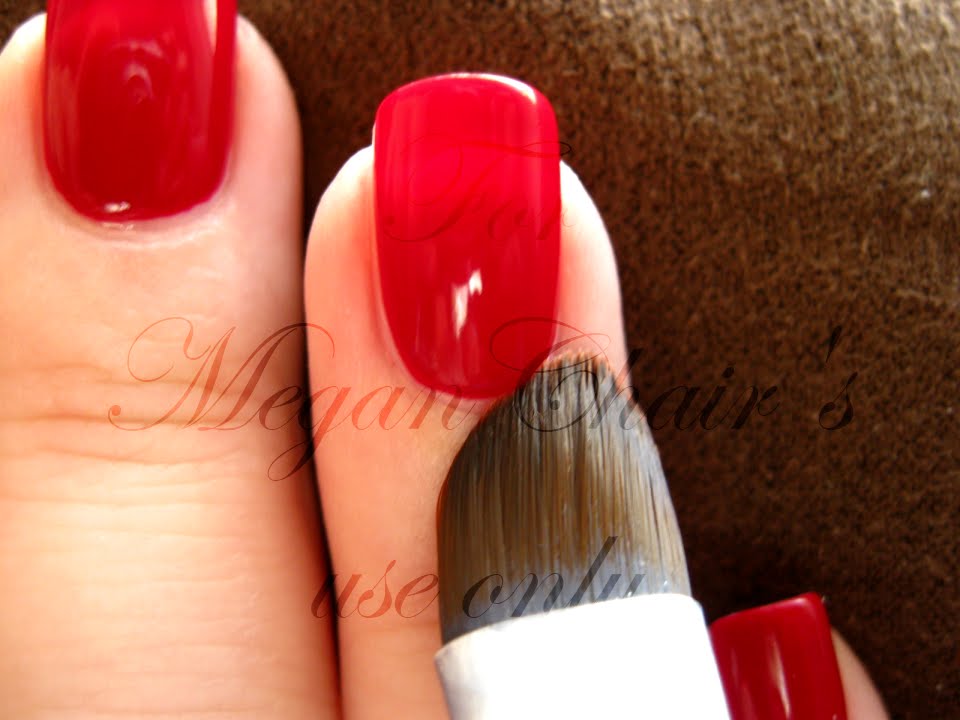
That's it! This is all I do to clean up. It takes two products and it's very simple. I've gotten much better through practice (at both applying polish and cleaning it up) so you will, too. When I first started cleaning up with a brush and acetone, it would take me about half an hour to do my clean up, but lately it's only been taking 10-15 minutes. It also depends on the type of polish (remember, pigmented polishes take longer), but you get better (and faster) with time. Here are a few close up pictures of the end result:

Keep in mind that these pictures were taken with the macro setting so it's really close up and exaggerated. The gap is definitely not as noticeable in real life. Plus, as you get better with painting your nails and cleaning up, you can make your gap even smaller. Mine is about half that size now.


And last, but not least, the overall manicure.

I hope you enjoyed my clean-up tutorial and let me know how it works out for you if you try it!
Like this? Click below to let us know!
57 comments:
Thanks for the tutorial!
I think my brush must be too small, I've tried clean up with a 1/4 inch long brush, it was interminable. So I try to be veeeery careful applying.
I might try again!
Fantastic, as always. I don't have a brush yet, so I haven't tried this but I will soon!
Allya
Great idea!! Would the acetone eat up the bottle it's in? =P
And your manicure is so perfect, I don't think you can get any messier than me! I always get streaky nails! >.< Your application looks so even and flawless.
http://xmaterialgirlsx.blogspot.com/
Such a beautiful job, but I think I'm too lazy! Maybe I need to try a bigger brush. I have a filbert lurking somewhere I never use for e/s.
Thanks for the tutorial. I'm so glad you are blogging with PoP now! It's great to see you back. :)
This tutorial changed my nail polish life! Thanks for posting it here. I'm so glad you joined this blog -- you are very loved!
fan-freakin-tastic :o)
You always have the most fabulous nails. Thanks for sharing your tips. Will have to invest in some clean up brushes.
OMG! welcome back to the blogging world Megan!
I love this tutorial <3
Also, remember to actually wash your brush after you're done cleaning up...it'll last longer if you wash it with baby shampoo instead of just rinsing it with tap water.
Great tutorial, thanks a lot!
Your before manicure is even nicer than my after! Even though I've been doing my nails forever, I'm a sloppy painter. With light shades I'm not bad. Vampys and black are another matter. I look like I closed my eyes and just painted. I try to go slowly and carefully but I still stink. I use your method for cleanup and also a cotton wrapped orange stick. Yesterday was the first time my manicure cleanup was perfect! I don't know what happened but I did take much longer to do it all. I guess it was in honor of using the Christian Dior Lemon Balm. First time wearing it and it's lovely. Your tutorial is wonderful and should be read by everyone who does their nails. Thank you for doing such great detail.
Love it love it love it.
I do the same thing, different brush. Might have to try that Eco Tools brush. I use a flat liner brush from sephora that came in a kit. I never liked it with liner so I just used it for clean up. It's synthetic though and I think the acetone is killing it slowly.
I tried the brush thing after you first recommended it. The art brushes I used are OK but dont soak much up so require a lot of dipping. Im going to keep looking for a good brush.
Still I must comment, you're application is still really nice & rounded pre-cleap up, even if you did get some on the side cuticle beds :)
Hi, thanks for the excellent tutorial, I'll have to see where I can pick up some acetone. To be honest, the likelihood of having a messy manicure has stopped me from trying those vibrant polishes on my fingernails.
Would you mind answering a question? My daughter and I were arguing about whether your nails are real or not ~ I think they're real, but she doesn't.
This is a fabulous tutorial and the photos are incredible... might I make a suggestion as to something that could make this process a whole lot easier? YOU PAINTING MY NAILS IN THE FIRST PLACE. You're flawless in your polishing!
Thanks for all the great comments, guys! I really appreciate it.
@Pailette, just keep trying! It took me lots of practice before I started getting good at cleaning up. It took even longer before I could paint without making a mess. Once you get good at it, it only takes a few minutes that I think are well worth it. :o)
@Allya, If you try it, let me know!
@~Lisa, it won't eat the bottle that it came in, but I can't vouch for non-acetone safe bottles. I'd just leave the acetone in the bottle it comes in.
@Sandi, if you try it, let me know how it goes!
@tape_queen, thanks! I'm super happy to be here.
@Myrna, thanks! I'm glad I backed everything up before deleting.
@amy, thanks! :o)
@Mocha Mish Mash, thanks! It's super easy once you get the hang of it.
@Berry T, thanks! :o)
@MoLo, that's a good tip! Thanks!
@Morrigan, thanks!
@Lucy, awww, thanks! I really appreciate your kind words. I bet your manicure looks perfect!
@Gina, definitely try some different brushes until you find one that fits you best. It took me a while to find one I really liked.
@Lauren, thanks! I'm actually getting better now at not getting polish on my skin while painting. I hope I can someday go without clean up, though.
@Snapdragon, you can get acetone at Sally Beauty Supply. I think even Wal-Mart has straight acetone, too. Just be sure it's not acetone polish remover, but straight acetone. Oh, and you win! My nails are real. :o)
@extraH, thanks! I'll paint your nails any day. :o)
Ha! That's my problem, or at least part of it. Although I have the same brand, my acetone is the polish remover with wheat protein and Vitamin E (I wondered why it didn't smell as bad as I thought it should), not the pure nasty. Glad I came back and checked your responses before I headed over to Sally to restock my basics tomorrow.
MeganChair,
Thanks so much and I've tried but I have a problem with the polish balling up and leaving ridges. Do you do this when the polish is still wet or after it dries completely?
I'm going to try the brush you suggest. :)
Thanks a bunch,
Susie
My favorite way to clean up! Thanks for re-posting...and being here :D
Great post. I do the same technique, but I use an E.L.F. concealor brush to do the clean up. Bristles are perfect, tight and full and it's cheap $1. I have been using mine for at least 6 months and still going strong.
What a difference the pure acetone and a good brush with stiffer bristles makes! I'm quite sure I'll never reach your level of expertise (still too lazy, lol), but boy are my manis going to be neater.
perfection....! i think i'm getting better at this technique.. but i still don't like using pure acetone...and i think i haven't found the right brush yet... so my cleanup isn't 'striaght' but warbly...or maybe that's the hourly coffee cup intakes i drink..
I love this tutorial, but I suck at it (I'll keep practicing though). I use an orange stick with a bit of cotton wrapped around it for the most part.
Awesome post, once I started to use acetone and a brush (about a couple month ago) it totally changed my manicure, now its always perfect! :)
this is a fabulous tutorial. thank you!
Hi Megan,
This is wonderful, I especially like the way you explain the size and the shape of the brush, I tried so many different kinds after I read your tutorial, but only the square shaped one works! You Rock!
Oh my goodness. Thank you SO MUCH for this!!! I've emailed a few nail bloggers before about how their manicures are so perfect but no one had ever responded. Thank you for this tutorial! Time to go out and buy a stiff brush. :)
Hi Megan,
Thanks for the tutorial, it works like a charm!
I love it so much, I put up an entry about it in our blog:
http://blog.nailartistsunited.com/2010/09/megans-secret-to-super-neat-manicure.html
Haha! I knew it! Thanks for getting back to me and pointing me in the direction of WalMart, I'll have a look and see if I can find some there. I'm looking forward to trying this at some point. :)
OMG, that's a lot of work! I'm not sure it's worth it but it looks really amazing!
Wow .. I'll have to try this method. Right now, I just use q-tips, cotton and toothpicks. I pull the cotton apart and twirl it around a toothpick and then dip it in polish remover and it works pretty well. But, if the polish is too wet, the little fibers of the cotton can get stuck to it and ruin a nail. :( Your nails look *perfect*. If I didn't know any better, I'd think you used photoshop to edit the photos. :)
I am glad to see that you have back your awesome tutorial here :), thank you!.
xoxo
Arie
Great tutorial! Hope you don't mind a few questions. What base and top coat do you use or recommend? How often do you change your polish? What cuticle cream would you recommend? Thanks in advance :)
Oh, and sorry for the long number that appears instead of my name. I post using my AIM account and that's what shows up.
Awesome tutorial, I'm definitely going to have to try this. Found this on tumblr (http://nailingit.tumblr.com linked it), and now I'm going to follow your blog!
This was really helpful!
Very informative! Just a question, are you left handed? I'm left handed, and I have a harder time with my left hand than my right hand.
Pretty red polish, btw! ;)
Thank you for this very handy and beautifully written tutorial!
The red polish is gorgeous on your very pale skin, by the way!
Happy Monday,
Grace.
How To Remove Nail Polish
Thank you so much for taking the time and efford to write thia very useful article
Easy to follow tutorial, and educational too.
nail polish sale in massachusetts
This is very simple tutorial to understand it for removing the nail polish. Eyelash Tinting Melbourne
This was so amazing, thank you! I'm definitely going to try this!
Great post about Spa Manicure For Kid
.
Thanks for such exiting post.i Appreciate that your post is really informative.
Wow, thank so much! :) Trying this out ASAP! Nail Salons In Pigeon Forge Tn
I may've said before, your nails are PERFECT. Love them.
A Manicure is a cosmetic beauty treatment for the fingernails and hands performed at home or in a nail salon.
Thanks for sharing Very Nice Tutorial.
Great ! Very nice blog and excellent things exist in your blog content. thanks for sharing..
Great information... Thanks for sharing..
How To Keep Your Fingernails Clean?
Thank you soooo much! Love this! :-D At last my nailart is beautiful! It's all about the details.
I am finding this 6 years after you posted it (I was looking for a cleanup brush, and I love your idea for going through all my small eye brushes I don't use. I feel like elf concealer is perfect but doesn't last). I am amazed by all your details and how it's exactly what I do! You even got the point about moisturizing hands while damp before photographing! Great job!
Latest 70+ nail polish pictures and Wallpapers gallery 2016
Thanks that you sharing, cool
https://www.facefigurati.com
Thank you for a great and inspiring blog post. I just want you to know that I enjoyed reading your post. https://www.hairsalonues.com/
Post a Comment