Showing posts with label Yellow. Show all posts

Friday, August 2, 2013

Rainbow gradient

I love gradients - they're easy and impressive, even if clean-up (and the resulting angry dry skin) is a bit of a pain. Here's one I did recently using some Bio Sculpture polishes, which I wore to a meetup with some Sydney nail fanatics:


And here's what it looks like after I covered it with permanent marker, using PVA to stop the marker from streaking (see the tutorial I did here)


I wish I'd thought of it sooner! I'm also quite surprised by how much darker it looks after the markering - I mean, it should be pretty damn obvious since I'm covering 60% of the nail in black, but the contrast between the original and the final is pretty striking to me. Silly irrational human brain!

(You may have noticed that I used the same colours as I did for this gradient Movember mani, because I am clearly somewhat lacking in imagination and if the colours are from the same collection, that's my gradient choices done. But seriously, that Bio Sculpture collection has the prettiest matching gelato colours. That's my story and I'm sticking to it.)

Wednesday, March 13, 2013

Pastel hearts and glitter rain!

This was my sweet Valentine's Day mani which I posted on my own blog, but before I took it off I added a glitter gradient with Hello Darling 24K, because I could.


I've developed a repulsion to the whole "buy things to prove your love"/"if your man really loved you he'd spring to get flowers" aspect of Valentine's Day, and I thought the boyfriend and I were happy not doing anything together for it (especially since we celebrated our anniversary the week before), but at the last minute he decided he felt neglected, so we ended up with the added guilt of trying to make rushed plans and failing. I guess that's what I get for dating an attention whore! I did make and demolish some kickass cauliflower soup though, so if nothing else, Valentine's Day really rekindled my love of the Brassica family.

Monday, March 11, 2013

Bourjois Jaune Trendy

Bourjois Jaune Trendy
Sunshine yellow creme. Bought in a drugstore in Montreal, probably one of the last nail polishes I've bought since last July. Four coats, not out of line for a yellow.

Banging my head against the wall about my dissertation proposal. If I can get this done before this summer, I can be done with the PhD by next summer...

Tuesday, February 12, 2013

Mardi Gras! F4 Polish: Drunken Zombie :)

This will be a busy week for "theme" manicures! Lunar New Year, Mardi Gras and Valentine's Day!

I was going to do something more elaborate -- then saw this polish in my untried indies stash. It was perfect! F4 Drunken Zombie -- it's from their Halloween collection last year. It's a mix of different sized green, purple and a smattering of black hex glitter along with some small gold glitter in a green undertoned yellow creme base.

I layered it over a bright yellow, Sally Hansen Mellow Yellow, to have a more Mardi Gras yellow effect.


You can see what it looks like in the bottle in the 2nd picture :) It applied well, this is 2 thin coats over the yellow base. Enough glitter where you could do one coat, but I like using thin coats for more control.

F4 Polish can be found on their Facebook here and their Etsy here!

I'm going to eat some sweets in honor of Mardi Gras/Fat Tuesday, y'all have an awesome day!

Follow me!
Instagram: xminhae
Twitter: miiinhae
Pinterest: minhae


Monday, October 29, 2012

Summer neon gradient with black and white glitter

One of my long-time lemmings was Lynnderella's Connect the Dots, so I was overjoyed when I found out that one of the many black and white glitters that followed in its wake was available in Australia. I layered Peita's Polish Zebration over a gradient of Darling Teenage Dream (pink) and Endota Spa Ephraim Island (soon to be renamed Paradise Point - neon yellow/green):


Teenage Dream is the first neon I've tried which is properly neon without white creme underwear - it only takes 2-3 coats as well, which is very impressive. Ephraim Island/Paradise Point is an interesting polish - one coat over white is neon yellow (the most neon yellow I've ever seen by the way - in person it sears your retinas!), but 4 coats on the bare nail is definitely neon green.


I'm so glad a similar polish has successfully killed off my HTF lemming - HTF lemmings are the worst!

Friday, October 19, 2012

Kat Von D Sparklehorse

Kat Von D Sparklehorse
What IS it with me and nail polishes that take an absurd number of coats? That cheerful, glittery, warm-yellow-gold was six coats and still not opaque. Maybe it was supposed to be sheer but I'm not a fan of having my nails look sparkly and jaundiced. Nevertheless, Sparklehorse was marvelously eye-catching... even though I had terrible cuticle drag, immediate shrinkage and a very long application time, followed by an even longer dry time. At least it didn't chip quickly or anything. :P

Saturday, October 13, 2012

Spring pastel tape manicure with gold accents

This is a mani I did, inspired by the range of polishes Darling sent me. Darling are a new-ish Australian nail polish company, and their formulas are very impressive! They do that self-levelling thing that good polishes do, hiding fudgy application. As well as a range of gorgeous lacquers, Darling also carry mixtures of beads for caviar manicure (the Rock Candy range), and they've got some super exciting things in the works (super cute nail decals which I got to try out at the Beauty Bloggers Utopia conference, and something metallic for Christmas which I'm not going to leak too much about!


This is actually the NOTD I wore to the first day of BBU, which was a blast - chocolate for breakfast, learning exactly what Bioderma's "micellar water" is, hauling at IMATS, manicures in the media breakout room, going backstage at Legally Blonde The Musical with the founder of awesome sample subscription box Lust Have It! And of course, one of the greatest things in a beauty blogger's life has to be when other beauty bloggers gasp over your nails in real life! No complaints here :)

The polishes used are Darling's The First Corsage (lilac), Butter Wouldn't Melt (yellow), Hopelessly Devoted (pink) and likeomg (gold). And here's what the cremes looked like before the tape bonanza:


I think the gold really helps tie the skittles together!


Saturday, October 6, 2012

China Glaze Electric Pineapple

China Glaze Electric Pineapple
I'm in utter denial that it's not summer anymore. Hence, a greenish neonish yellow. (It's just slightly greener in real life than in the photo.) Unfortunately, this polish was thin (I think we're looking at 4 or 5 coats up there), prone to cuticle drag, and then chipped in just a few days. Boo. Still, it was a nice little early fall pick-me-up.

Thursday, May 31, 2012

THEME WEEK - My Favorite Neon :)

I admit, with my life being filled with glitters this past year, I haven't had time to look at neons. But I figured, with it being summer, I should give them a chance! So, this is pretty much the first neon I've almost ever tried (I'm sure) but I love it already! I went with the classic neon YELLOW. Nice, bright and obnoxious in a good way.


China Glaze Yellow Polka Dot Bikini. Trust me, it's bright. And totally matches neon yellow highlighter. It's super lovely and bright and may I say, vivacious? I'm not sure if people were complimenting me when they would comment that it was REALLY bright, but I'll take it as such :P It was overcast when I took this picture but this just goes to show the true neon-ness of it.


And of course, the add on of glitter. I did one coat of Essence - Edward. I love the teal/green square glitters! The yellow and the green matched so well together, I loved looking at it.

edit: Sorry! I must have been half asleep when I wrote this post, it's China Glaze Yellow Polka Dot Bikini :)

Thursday, December 22, 2011

Illamasqua Load

Illamasqua Load
This was a disappointment. First of all, it's more yellow than I thought it would be (though it isn't as yellow as this photo is). Second, it needs four layers to totally even out, which is really unusual in my experience with Illamasqua. (Not at all atypical of pastels though.) When I showed my SO the polish (and its name), he asked me what possessed the company to want to make a nail polish that color. I didn't know the answer to that.

In the meanwhile, I gouged a frakkin' big chunk of skin on my left index finger while sewing something for my new nephew. (Well, technically, I'm not married to my SO, so his nephew isn't really my nephew... but he kind of is: my SO and I operate as a permanent couple. We just don't care about making it a legal or religious thing.) No NOTDs for me for awhile because the crater in my finger is totally painful and not at all pretty. Luckily, I have a backlog of NOTD photos to post. :)

Monday, August 29, 2011

Hellpolish - Essie Barbuda Banana

I don't have many HTF (hard-to-find) polishes in my stash. This one was fairly recently acquired, and I was so excited! I've always wanted a soft yellow, and you know how much I love Essie...so I thought this would be perfect!

Alas...


Looks nice, eh? Lies!! It's a beast!! This is by far the rougest time I've ever had with a polish. I struggled. It was epic. It manages to be runny and streaky, but chalky. Thick and gloopy, but no pigment. Hellpolish. I suppose it is the nature of yellows though right? Even though I had to battle with it, I am still debating keeping it - Essies are so special to me, and I adore the colour so so much. Rumour has it that Essie is coming out with some easter-egg brights for next spring - perhaps my perfect yellow will be in that bunch?

Have you had any experience with pale yellows - good or bad?

kittytokaren


Wednesday, May 25, 2011

Hello Kitty Banana Cream and Minty

So I've really gotten into jewelry making lately. (I don't know why I'm taking up all these craftsy hobbies lately: first crocheting and knitting, now jewelry making... I REALLY don't have time for this sort of hobbying.) And I was on FireMountainGems.com, contemplating a huge order.

See, this is how Fire Mountain seduces you: every item on their website has four prices. There's the price for if you buy 1-14 units of anything on the website, then between 15-49, then 50-199, and then 200+. The prices are highest if you buy the least amount of stuff but then it gets lower and lower the more you buy and buy (in one sitting). The prices of popular and expensive stuff, such as Swarovski crystal beads or things made out of real 14k gold, barely budges a dollar but, for the majority of items, by the time you have 50 items in your cart, cost between 1/4 to 1/2 the original price! (Man, if they sold nail polish like this... yikes.)

Anyway, the reason I brought up Fire Mountain was because they have a lot of handy dandy guides, such as Pantone's "Color Forecast" for the upcoming seasons. I don't really get how the Color Forecast thing works but here the projected hot colors of Spring/Summer 2011. I was struck at how many of the spring and summer polish collections had colors that can be found in this palette. Maybe there really is something to these "forecasts"? Or maybe more people pay attention to them than I had thought.

Anyway, the reason I bring this up is because it looks like the Hello Kitty "Liquid Nail Art" polishes are taking some cues from some of these...

Hello Kitty Banana Cream
The one saving grace of these polishes: they come in cute little Hello Kitty head bottles. This basic pastel yellow creme was hell: four coats, still bald patches here and there. Some cuticle drag. Yellows are always hell but this was an especially intractable one.

Hello Kitty Minty
This one had slightly less cuticle drag but it was also pretty streaky and uneven. The above is four coats, which is too much for a minty creme. Plenty of other minty cremes out there that apply beautiful in three coats tops.

These aren't quite sending me back to Sephora to pick up more. Definitely regretting spending money on them. $10 each and not even the standard 0.5 fl oz!


Monday, May 9, 2011

Testing out a birthday gift (and Chanel Mimosa)

My Dad got me an iPad 2 for my birthday today and a Camera Connection Kit (whose USB functionality was largely destroyed by a previous iOS update). But the SD connector thing works. Kind of annoying but it's very much a spoiled bratty bday girl problem.

Anyway, I decided to give the iPad (and camera kit, and PS Express and BlogPress iPad apps) a test run with my NOTD, Chanel Mimosa. It's pretty nice to be able to crop using a touchscreen. But I can't find a way to resize photos where the photos remain looking decent; it's kinda weird. I'm probably doing something wrong.

Chanel Mimosa


Uh.... I should look up the HTML tag used for centering...

Mimosa itself... I wanted this polish. I waited for this polish. And I paid for this polish. Damn, that's a lot of anticipation and money for something that still has bald spots after four coats. And chips after only about 36 hours of wear. That's kind of unacceptable. I do love the color though. Sunshine yellow with the typically subtle shimmer (gold-colored) that Chanel enjoys using and I enjoy wearing. It's the yellow shimmer I've been desiring for years -- most yellow shimmers are nightmares on me because they often are sheerish and gold-leaning -- but the application ruins it. I understand that crappy formula is the nature of the yellow beast but dude... at least charge me a price that's commensurate with the quality of the polish. :P

Right-o. Time to stop mucking around with new toys (which also includes a pretty pair of Pyrex or pyrex-like knitting needles, a steel crochet hook that look like a rocket and a plush Weighted Companion Cube). There is work to be done. A lot of it.

By the way, anyone want a used iPad (in great condition, with Apple's black case thing)? I'm happy to sell my old one for relatively cheap. Currently, I have no idea what the going rate on used iPads are so make me an offer (please email me using the form above). Happy to knock the price down if you don't need the charger or USB cable for it (mostly because I can't easily find either).


Tuesday, March 8, 2011

Two Revlon Top Speed polishes: Cloud and Electric

The funny thing about photos is that sometimes, the great polishes turn out looking kinda crappy... and the totally crappy polishes come out looking great.

Revlon Electric

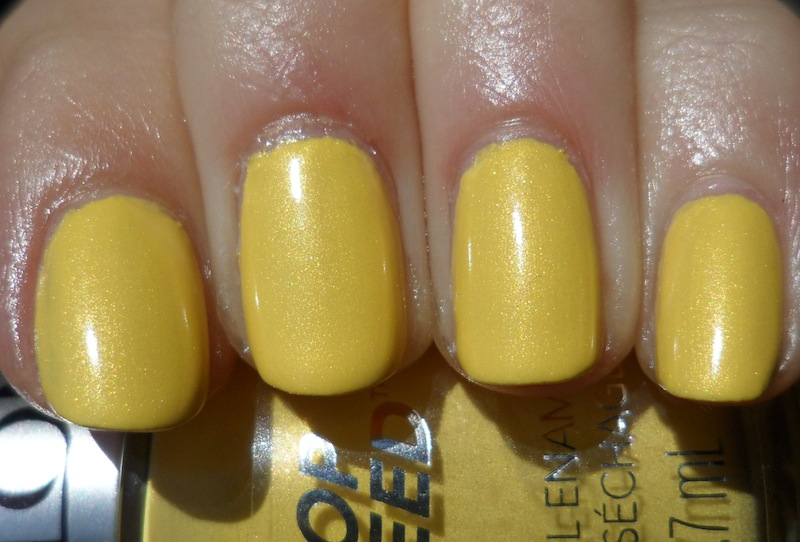
Lemon yellow shimmer. The photo actually makes it look like it was a nice polish. Do not be deceived! It was not that much worse than the typical yellow shimmer (streaky, sheerish, hard to build) but I've tried enough yellow polishes to know that it's possible to have a good yellow that is perfect in two coats, three at most. This was four: it was a hot mess on my nails and I thought that maybe if I put on more layers, it would look better. That was not true.

Revlon Cloud

It's not quite as much of a baby blue as the photos make it out to be; it's more of a light lavender. This one applied beautifully... but it apparently needed a third coat. (I did this swatch in the demi-gloom of my apartment. I should maybe try turning on lights next time.) The above photos are just two coats. But even though there's a bit of patchiness, I think that it's obvious that it's pretty nice for a two coats of a pastel.


Sunday, February 27, 2011

China Glaze Lighthouse and White Cap (Anchors Away, Spring 2011)

One "ewww" and one "ohhhh"...

China Glaze Lighthouse
This one is the "ewww". I want so badly to find a medium yellow shimmer that I actually like. They all look horrible on me and the application on this one was not at all fun. The above is three coats (with super obvious VNL) and I didn't dare do a fourth coat because the formula was thick and hard to manage. This is on the second day of wear and I already had a few chips. :(

China Glaze White Cap

It's like fairy dust! Yes, it's sheer. It's very sheer. This is four coats but the formula was very smooth and easy to use. I don't really know how to describe this color: technically, it's white? But it's white shimmer shot through and through with this opalescent glass-fleck-like shimmer. It's seems like it's almost equal parts opalescent shimmer and white shimmer. It's just so ethereal and pretty.

Close-up of White Cap


(These polishes were sent to me by China Glaze.)


Saturday, October 30, 2010

Dare To Wear Back To Basics Collection

So I ordered this collection of polishes after seeing Lextard's swatches on her blog.  Seriously, when I need lemmings, I just check out her blog.  I have a nail crush on her.  I got these from Ebay for around $30 (USD) after shipping.  Not a bad deal, I think.  I really like all of them except I had some trouble with the white one, which I'll explain later.  For now, here are my swatches!

First up, this is True Red.  Seriously, this one's a perfect cherry red creme.  I used two coats for this swatch, but I could have gotten away with one if I'd been a little more careful.


This is Yellow Twist.  I don't usually wear yellow polish, but I do know about how difficult they normally are.  This yellow isn't difficult to work with at all.  I only needed two coats and I will definitely use this one as my perfect rainbow yellow from now on.  Great formula.


Enchanted Forest is a deep, mossy green.  I was under the impression that this was a jelly and I have no idea where I picked that up.  I might be confusing it with Nars Zulu.  This is definitely a very pigmented creme and I only needed two coats for this swatch.  Still, it's a great color and I'm glad I have this set.


Ocean View is a medium blue creme.  It's super pigmented as well and I only needed two coats.  It's been a while since I swatched these, but I wrote "perfect" in my notes when I swatched this one.  It's seriously perfect.


Powerful Black.  I needed two coats here, but the formula is super creamy and pigmented.  When I reach for a black creme for layering, I usually go with Wet 'n' Wild Black Creme, but I just might reach for this one next time.  Sure, I needed one more coat, but it's super glossy and nearly perfect to work with.  Very nice, indeed.


And lastly, this is Rue St. Vincent.  Unfortunately, I think my bottle sucks.  The formula is chunky and watery at the same time.  I carefully applied three coats for this swatch, but I would definitely not wear this one as a manicure when there are much nicer white polishes out there (Sally Hansen White On, for instance).  I swatched this one first and was a bit disappointed so I'm glad the rest made me change my mind.  Since this was the only one with a horrible formula, I'm thinking that it's just a fluke.


Overall, I really like these.  The kit came with a clear top coat as well.  I'm pretty sure it's not fast drying, but I'm going to try it out with Seche Vite to see if that'll stop the shrinkage I get with Seche Vite.  All these swatches are without top coat (most of mine are) and you can see how glossy they are.  I am very glad I ordered these.

UPDATE:  I tried the Dare To Wear top coat underneath Seche Vite and it ended up wrinkling.  :o(

Wednesday, October 13, 2010

Essence Sun Dancer

Oh, yellow. You do make me happy.


Happy, yes, ecstatic, no... and I was really excited to be ecstatic.

Don't get me wrong, I love Essence polishes, and this is a decent one. The best way for me to describe this one is taxi yellow; not too bright, but you can't say this one is subtle at all. It went on like a dream, too - three coats and little to no streaking. If I was Konad-minded, I would totally checkerboard this one. Get it? Checkerboard? Like the taxi? Ah, I kill me.

I have this fear that I am flying through the Essence polishes too quickly! Come on, Essence, give me something to sink my teeth into! Anyone out there have some good Essence colors or similar brands to this one that I should try?

Happy day, all!

Saturday, October 2, 2010

Picture Polish: Mellow Yellow and Malteaser

Yay! My first two Picture Polish NOTDs. One is fabulous... and the other one, not so much. Both were sent to me for review by Picture Polish.

First the fabulous one:

Picture Polish Mellow Yellow

I love pastel yellow cremes. This is a perfect example of one and it went on so very well! If I had done thicker coats, I could've made do with two coats but I did three thin coats for this one and it was perfectly opaque and smooth (and utterly non-streaky) by the third coat. I wore this for a couple of days (using Gelous/Diamont) and there were no chips or shrinkage, and minimal tipwear. Decent dry time too with a quick dry topcoat.

Picture Polish Malteaser

This dark taupe creme was a nightmare. It applied a little goopily and was more sheer than necessary for the darkness of the color. It took three coats to get opaque... and it wasn't a fun three coats to apply. But the worst part was... it bubbled BADLY. I don't know if it reacted negatively with my basecoat or what but I had a ton of little bubbles on my nails. It drove me so crazy, I couldn't stand it for more than half a day.

It's so odd to me when a pastel yellow from a company applies beautifully... but a dark taupe doesn't. Oh well. Ten more Picture Polishes to go... :)


Saturday, September 25, 2010

Color Club Tangerine Scream & Volt of Light... I am in denial that summer is over!

A couple of polishes from Color Club's awesome ElectroCandy collection from a couple of years ago. It's an amazing collection of neons that have contrasting color shimmer. I found mine at Ross for $8.

Color Club Tangerine Scream
Take that, autumn! I defy you with three coats of neon orange with ridiculously bright shimmer!

Yeah, okay, I'll go do my homework now. Boo. Maybe one more swatch?

Color Club Volt of Light
Neon yellow with teal shimmer. This one is one of my favorite colors ever... except that this is five coats, possibly six. And is that VNL I see?! Still, it went on so thinly and smoothly that it wasn't painful at all to do all those layers, just a tad time consuming. Didn't take forever to dry either, surprisingly with all those layers! I wish I had gotten a shot of this outside rather than just in the lightbox.

OK, now I'll really go do my homework. It's my last quarter EVER with homework! After how many years of schooling? (13 K-12 + 4 college + 1 master's + 2 PhD = 20 years worth of homework... plus many summers worth of academic camps.)


Wednesday, September 1, 2010

Butter LONDON Fall 2010 swatches: Bumster, Victoriana and Marrow

After hearing about all sorts of bad application problems people had with the somewhat costly ($14 a pop, I think) brand Butter LONDON, I avoided buying any for the longest time. But then I saw swatches of these online and fell hard... and then found myself staying at a hotel right across the street from a huge ULTA that carried Butter LONDON after I had won $150 for my research at the conference...

The Universe conspired to get me to buy Butter LONDON. And I am so glad! (Though they were out of All Hail McQueen... sad.)

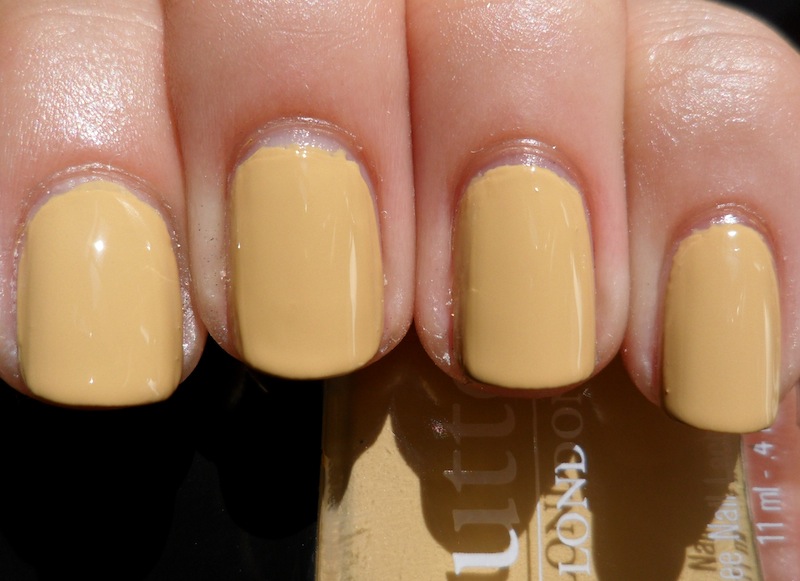
Butter LONDON Bumster
I love this muted saffron yellow. This is officially the easiest yellow I've ever applied: two coats! (Wow!!) Well, two coats on most fingers. My index finger needed three. So smooth and easy to control. As many readers undoubtedly know about me, I love yellows and this was certainly worth the $14 to me, as it is such a well-made yellow.

Butter LONDON Marrow

This is maybe not the most unique polish but it does have a nice twist: the very subtle (but still noticeable) silvery shimmer that actually seems to be more of an iridescent shimmer (click on the second pic for a closeup). Again, two coats, super easy application.

Butter LONDON Victoriana

This one is a stunner. Teal blue with intense silver shimmer. It's like they took Essie Sew Psyched (or RBL Diddy Mow) and punched up the saturation and multiplied the shimmer by a thousand. I rarely ever do a mani with polishes I've swatched right after swatching a bunch: it just feels like a waste with so many untrieds. But this one... this one I wore as an NOTD right after. It takes two coats. A word about the application though: you have to use thin coats on this one or else it gloops up a little bit. I did my swatch with thin coats but then did my NOTD with thick coats -- by the time I'm done swatching, I'm pretty impatient to get on with my day -- and my NOTD was kind of rough and bumpy prior to applying topcoat. (FYI, it also dried fast and well with Diamont tc and unlike some polishes that are topped off with Diamont, I have no shrinkage.)

So I tallied up my working out from last month (which was a bit under par, since I decided not to exercise properly while away in Chicago and I skipped out on about a week because of either exhaustion from Chicago or just feeling discouraged by this dumb wrist brace). According to the scheme I laid out at the end of July, in the month of September, I can buy:
6 nail polishes that cost $2 (or under)
3 nail polishes that cost $4 (or under)
6 nail polishes that cost $8 (or under)
5 nail polishes that cost $14 (or under)
0 nail polishes that cost $14 or over.

Okay, that's not a bad start. :)


Related Posts with Thumbnails